
The DV4mini
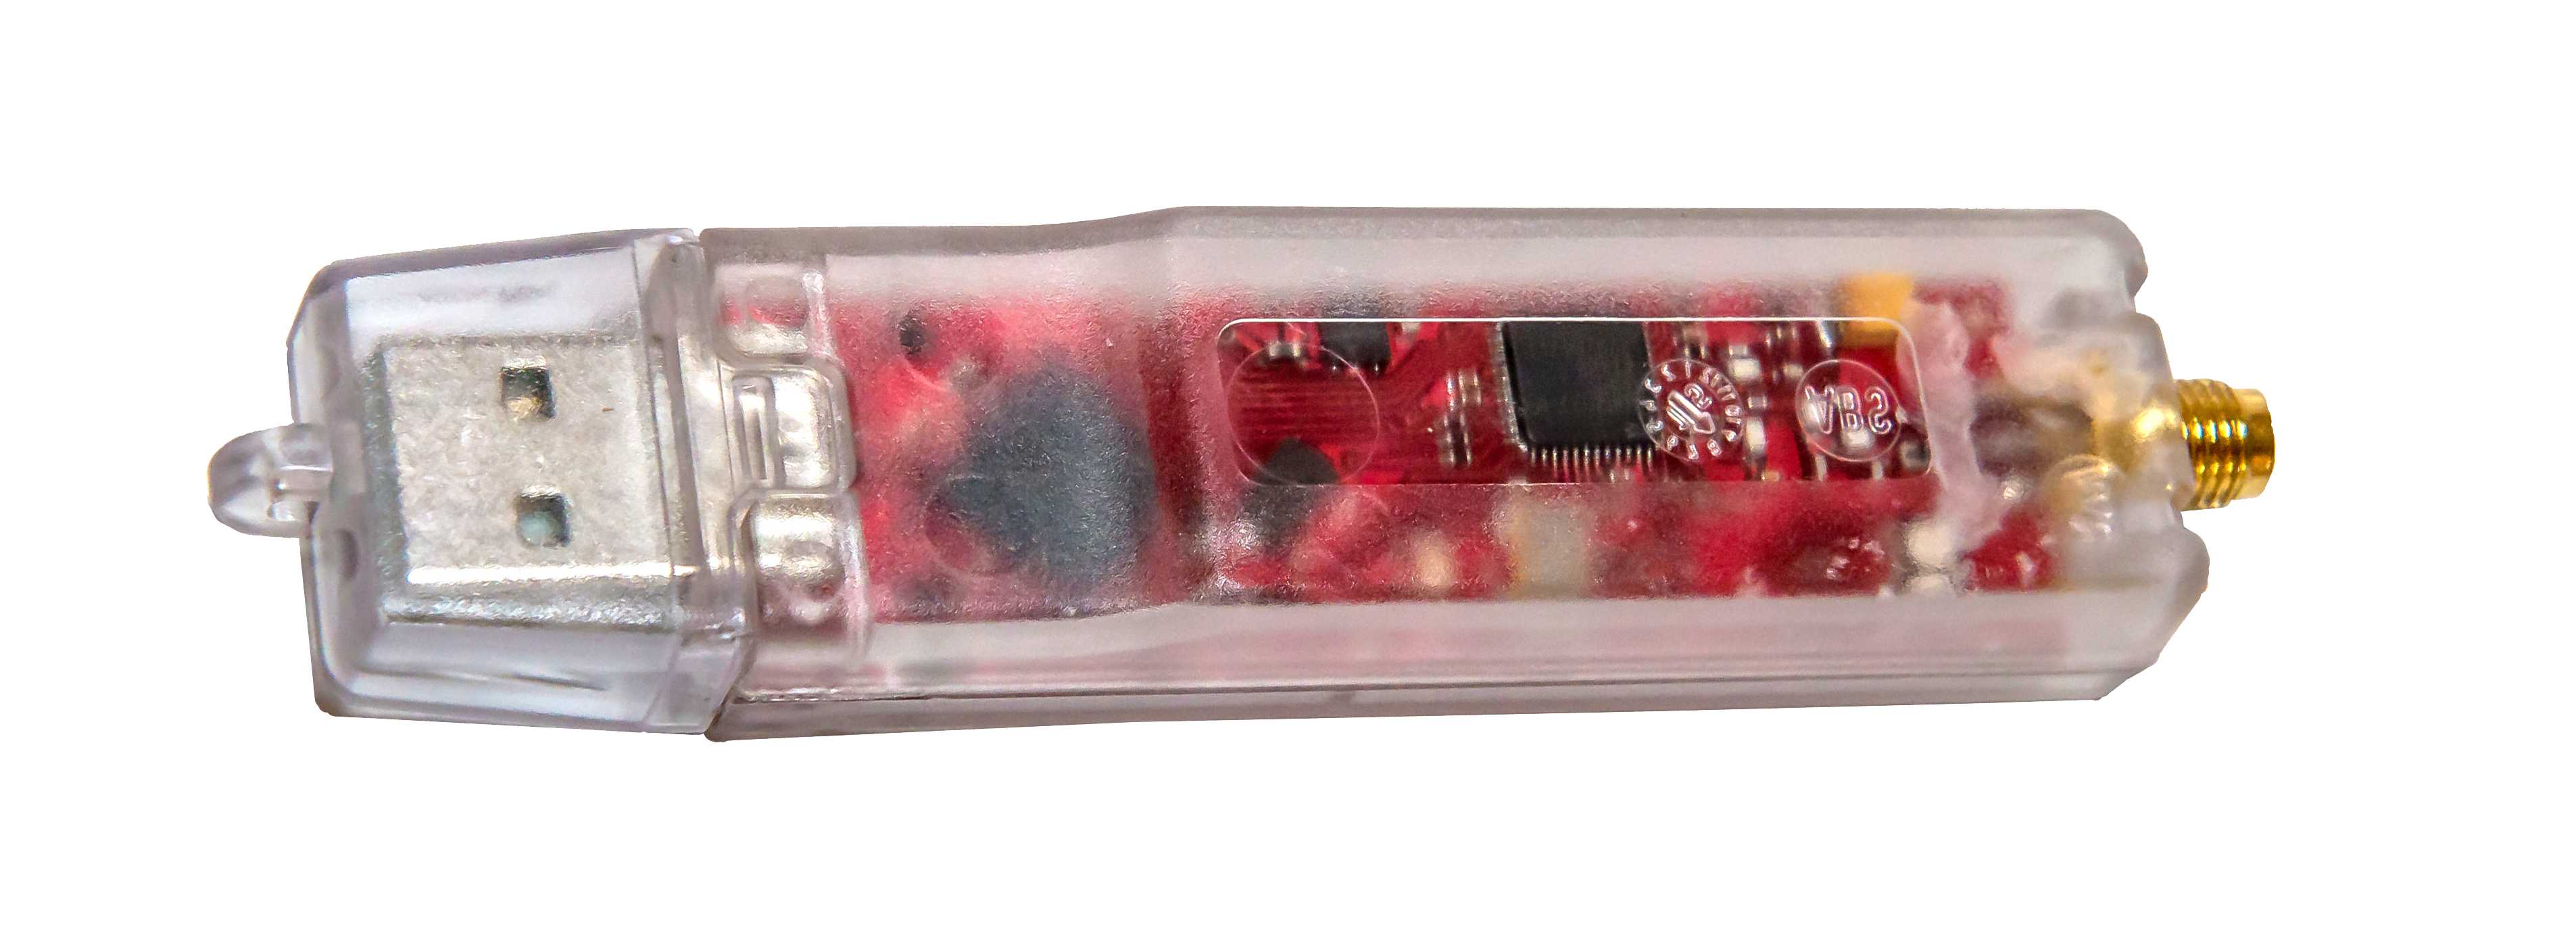
The DV4mini is a tiny but powerful USB stick that can change any PC into a HOTSPOT for the all amateur digital modes, C4FM, D-Star and DMR. It's also able to do DPMR and P25. It contains a powerful 32-bit micro controller as well as a complete 70cm transceiver and modulator/demodulator for GMSK and 4FSK (including raised cosine) as well as a USB interface. It does not require its own power supply as it is powered through the USB interface.
This hotspot brings the C4FM, D-Star and DMR reflectors directly into your shack.
The DV4mini doesn't require any firewall port forwarding, making it the perfect companion for travellers due to the tiny size it can be brought with you on your vacation and create an hotspot in your hotel, campground and more. The software work on any Windows PC and Linux. It's also possible to use it on a tiny Raspberry Pi, this is the most complete hotspot on the market.
For home brewers: the DV4mini runs well on single board computers e.g. Raspberry, BananaPi, Odroid etc.The minimum requirement is a Dual-Core. Such a hotspot would only need a few Watts and be useable in continuous service.
For developers: The interface between the PC and the DV4mini is disclosed. With the DV4mini one can transmit and receive digital data in the 70cm band, without regard to the mode, as long as the mode is coded for GMSK or 4FSK. That means one cannot only transfer digital voice but also data. The interface between the GUI and the DV4mini software is also documented and available.
- Where to buy :
- Where to buy in Canada / USA :
- Software download :
Technical specifications
Transmitter
Output Power: approx. 10mW
Modulation types: GMSK, 4FSK
Operating modes: D-Star, DMR, Fusion C4FM, P25 and DPMR
Harmonics: better then -60dB
Receiver
Sensitivity: -120dBm
Modulation types: GMSK, 4FSK
Operating modes: D-Star, DMR, Fusion C4FM, P25 and DPMR
Digital specs
Data rates: 9600 or 4800 Baud, depending on the operating mode
Bit rate HF: 4800 bit/s or 4800 dibits/s
TCXO: long term stability: better than 2.5 ppm
TCXO: short term stability: better than 1 ppm
Interfaces
USB plug type A to connect direct, no cable needed
Power supplied via USB
Antenna SMA-socket, 50 Ohm (you will need an external antenna which is available in the shop)
Software
DV4mini and dv4mini.exe: Software to create a C4FM, D-Star or DMR Hotspot. Input options for the call sign and the DMR ID number and functions to link to reflectors. Runs on Windows and Linux
Driver: The driver for Windows is included, Linux does not require one.
DV4mini unboxing video
Getting on the air with the DV4mini - Step by step procedure
In order to use the DV4mini you must obtain a unique ID which is coordinate worldwide as a digital ID. For all digital plateform.
Step 1
Get an ID from DMR-MARC team;
http://dmr-marc.net/cgi-bin/trbo-database/register.cgi
Step 2
Register your call sign, when you obtained your DMR-MARC number. The site below confirms your registration.
http://register.ham-digital.net/
You cannot just enter your call sign in the DV4mini software, you must enter the DMR unique ID, this will give you access to all the reflectors and all modes. You need also to make sure you are register to the D-STAR trust server in order to use this mode.

Step 3
Download and install the following software;
http://dv4m.ham-dmr.ch/V1.6/Windows/
You also need to install the C ++ 32 bit version, even if your PC is 64 bits.
https://www.microsoft.com/en-US/download/details.aspx?id=40784
Step 4
In the DV4mini software, insert your DMR ID in the DV Control section, enter your local frequency and select your operation mode.
Step 5
Make sure your Windows Firewall does not block the Internet access to the software, otherwise no need to make any port forwarding.
Step 6
Have fun !
You can monitor the activity in C4FM on the FCS001 or FCS002 reflector, see address below. FUSION-QUEBEC-GR is on port 50, you can do echo test on port 99.
If you want to see C4FM only, use the link below.
Raspberry Pi DV4mini image download and step by step installation procedure
Introduction Laboenligne.ca created an Raspberry Pi image so you can easy setup your DV4mini hotspot. The image include a VNC software that will run automatically after installation. You will need a Raspberry Pi and a microSD card of 8GB or larger. Before we begin, remember this : Root user is : pi All password is : raspberry *With Raspian (Linux) everything is case sensitive.
Here’s an easy setup step by step (click here for PDF version)
1- Download newest images from this website HERE.
2- Download and install the Win32DiskImager software from the link bellow. http://sourceforge.net/projects/win32diskimager/files/latest/download
3- You will need a USB dongle to read your microSD card, you can also use the microSD slot on your PC if equipped. Insert the microSD in your computer.
4- Run Win32DiskImager and select your microSD drive. Open the downloaded image and slick Write. It will take a few minutes, please be patient.
5- Remove the microSD card from your computer and insert it into the Raspberry Pi.
6- Plug a USB keyboard, a USB mouse and an external monitor using the HDMI connector.
7- Power your Raspberry Pi the image will be uncompressing.
8- Setup up your Wi-Fi network or network using the mouse and keyboard.
9- Turn off the Raspberry Pi and remove the HDMI monitor, keyboard and mouse.
10- Plug the DV4mini into the Raspberry Pi and turn it on.
11- Log on your local router and identify in the DHCP list the Raspberry Pi.
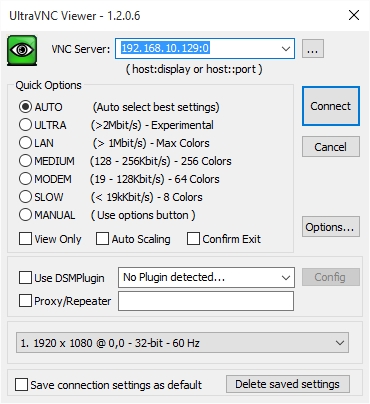
12- Download a VNC software, like UltraVNC for Windows or any VNC on any platform like Iphone, Ipad, Android, etc.
13- Use the remote VNC software with the IP address of your Raspberry Pi, bellow is an example of mine, 192.168.10.129:0, 0 mean root sessionfor your Rasberry Pi, on certain software you need to use 5900, like 192.168.10.129:5900. If you need to access outside your Network, you will need a port forwarding to 5900 TCP on your router or firewall.
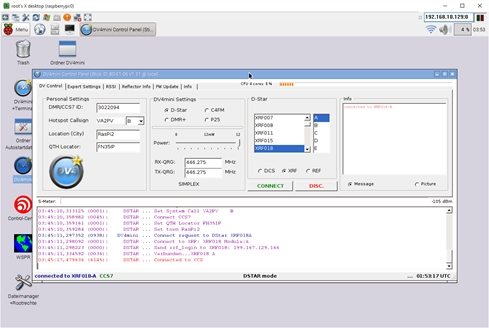
14- Now you should be controlling your Raspberry Pi in remote and it should look like this.

15- Double click on the DV4mini Icon, right after the initialization of the software and the stick, change the DMR/CCS7 ID to your ID. Choose your frequency, mode, reflector and have fun !
16- This final modification is optional but for security purposes I strongly recommend it. Changing your root password is easy, you can use Putty software in SSH or select the terminal icon when in remote.
a. Root password, type sudo raspi-config (enter) a menu will appear select the password change and fallow the instruction.
b. Changing the VNC password, type sudo vncpasswd (enter) fallow the instruction and reboot.
17- To upgrade your DV4mini software use the Internet browser in your Raspberry Pi and go to the download site. Choose the Linux ARM version and download all the files. Using the file manager, replace all the file from the download directory to the DV4mini directory. Using file manager select properties on all files and make sure all section says Anyone.
Raspberry PI DV4mini Compact TFT- English image
From original German version by Klaus DL5KV
Introduction
Here’s an easy setup step by step (click here for PDF version)
ATTENTION: Just found a bug into the image, even if you connect to FCS002 you will appear on the FCS001 dashboard. Febuary 15, 2016. The programmer as been notice.
I was inform by Klaus that when the DV4mini serial for ARM Linux is available (new version), just update this file and the DV4mini Compact software will be able to connect to the FCS002. Febuary 16, 2016.
We have created a Raspberry Pi image from the DV4mini with the DV4mini Compact software. This is an English image up to date with the DMR Brandmeister reflectors and the C4FM USA reflector FCS002.
You will need a Raspberry Pi and a microSD card of 8GB or larger.
Before we begin, remember this :
Root user is : pi
All password is : raspberry
*With Raspian (Linux) everything is case sensitive.
To execute any root command, you need to enter sudo before the command.
Here’s an easy setup step by step
1- Download newest images from this website HERE.
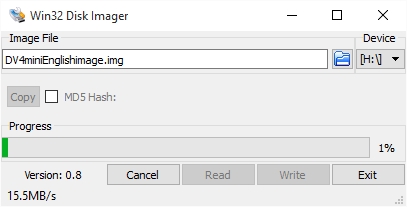
2- Download and install the Win32DiskImager software from the link bellow.
http://sourceforge.net/projects/win32diskimager/files/latest/download
3- You will need a USB dongle to read your microSD card, you can also use the microSD slot on your PC if equipped. Insert the microSD in your computer.
4- Run Win32DiskImager and select your microSD drive. Open the downloaded image and slick Write. It will take a few minutes, please be patient.
5- Remove the microSD card from your computer and insert it into the Raspberry Pi.
6- Plug a USB keyboard, a USB mouse and an external monitor using the HDMI connector.
7- Power your Raspberry Pi the image will be uncompressing.
8- Setup up your Wi-Fi network or network using the mouse and keyboard.
9- Turn off the Raspberry Pi and remove the HDMI monitor, keyboard and mouse.
10- Plug the DV4mini into the Raspberry Pi and turn it on.
11- The DV4mini Compact software will start automatically, enter your DMR/CCS7 ID, QTH, Locator and your good to go.
12- You just need to configure, reflector, frequency, etc. for each mode. Just click Write to save all configs.
Part 1 - Helitron DV4mini C4FM tests
Here’s my first tests with the DV4mini. I made a link with 2 sticks between a simplex frequency and my repeater through the Internet. With two sticks I’m able to reach my repeater from any Internet connection without losing any information (data).
Part 2 - Helitron DV4mini D-Star tests
This is a demo with the DV4mini in D-Star.
Part 3 - Helitron DV4mini on Raspberry Pi
DV4mini news and demo on the Raspberry Pi.
DV4mini with Wires-X + News and answers to FAQ
In this video we are showing how to use the DV4mini within the Wires-X network. We also present our new web site and more details about our C4FM and IP infrastructure.
We explain how the IP traffic worked for both, Wires-X and DV4mini reflectors.
We received a lot of questions about our video witch we answer in this video as well.
DV4mini Firmware and Software Upgrade on Raspberry Pi 2
I received a lot of questions about the DV4mini software upgrade on the Raspberry Pi 2, this video is showing how to do it easily. It also included the firmware upgrade procedure.
Note: In the DV4mini directory the Archives folder is not there by default, you need to create it. You can also just delete the older file you need to replace.
Winbook TW700 operating the DV4mini by Jeff VA2SS
Jeff VA2SS demonstrated the DV4mini operating from this low cost Windows Tablet.
DV4Mini compact software for Raspberry Pi 2 with tiny LCD
We've test the DV4mini Compact software from an image for Raspberry Pi 2 maid by KW-Soft. This software let you use a small LCD display like mine, 3.5 inch. The video shows how easy it is to switch mode with this software. The software is still in development, you also need to update the databases manually. The next version will have the auto update.
I did exchange emails with the programmer, Klaus DL5KV and he said that it is a beta version witch will be updated soon. You also need to change your Raspberry Pi in English because by default the image is German. You need to go in console mode and type sudo raspi-config, menu #4 (international) and select en_US UTF-8... You reboot and everything should be in English, even the DV4mini Compact software.
When updated by the programmer, the new image will be available from our download page on Laboenligne.ca. For those who wants to try it now, fallow the link bellow.
Special thanks to Alain VE2WQ for helping in the demonstration and Klaus DL5KV for making this software.
DV4mini Compact and Raspberry Pi 2, shack permanent installation
***ERRATUM: Michael callsign is DJ2VA and not DG2VA.
We received from ham’s around the world a lot of thank you for the DV4mini videos. I took a moment to thanks the people who made it all possible, I know they put time and effort for the development of this great product. So, on behalf of all the Laboenligne.ca fans, thank you !
The DV4mini is a collaboration of Stefan DG8FAC, Torsten DG1HT and Kurt DJ0ABR. Also involved Hans-Jürgen DL5DI and Michael DJ2VA. We don’t know exactly who is doing what, so if we forgot someone please let us know.
Special thanks as well to Klaus DL5KV for the DV4mini compact version, which is also available now on the official DV4mini software page.
Any microphone BOOM, cellular clip mount for tripod, 3/8 to 1/4 inch female adapter and 1/4 inch male to male adapter.
And of course, your Raspberry Pi 2 and you DV4mini.
DV4mini Raspberry Pi image, how to change the language
This video will show you how to change the Raspberry Pi main language. It also explains how to change the DV4mini software to English. It’s a very easy procedure.
C4FM network with Yaesu Wires-X and DV4mini combine
Here's a review of our C4FM network. The group is called FUSION-QUEBEC-GR or Laboenligne.ca. The network includes the DV4mini interconnection to Wires-X.
Pipo X9 running the DV4mini and the Wires-X software simultanuously
Not familiar with Linux ? Read below !
The Pipo X8 and Pipo X9 are perfect for dedicated applications in the ham shack, it’s fan less, it does not need a lot of power, it runs on 12 Volts DC, it’s a complete PC with 4 USB ports. You can run on all of them the DV4mini simultaneously with the Wires-X software for your node for about $30 more then a Raspberry Pi 2 kit.
You can get yours via the links below, depending of the preferred version. All of them will do the job for a simultaneous operation with the DV4mini and the Wires-X software.
For the Pipo X8 32GB click here (around $105USD)
For the Pipo X8 64GB click here (around $125USD)
For the Pipo X9 32GB click here (around $130USD)
For the Pipo X9 64GB click here (around $150USD)
NEW ! The Pipo X9S 64GB, better processor with 4 GB of RAM instead of 2GB (around $200USD)

New DV4mini Compact English Image with FCS002 and DMR Brandmeister
This is the new Raspberry Pi Image from Klaus DL5KV. This version as been change from German to English. It also has the newest version including the C4FM FCS002 reflector and the DMR Brandmeister reflectors.
DV4mini FAQ - For any questions please use the Forum
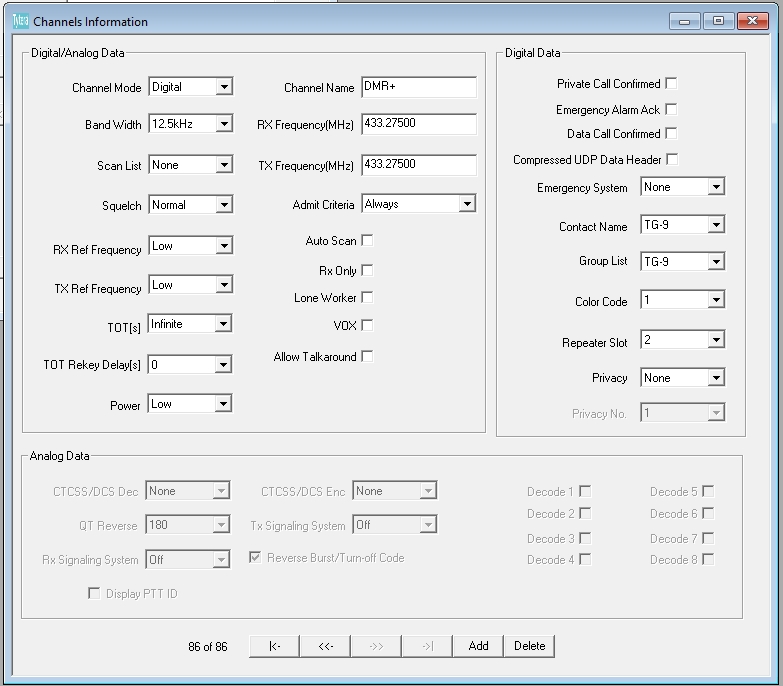
DV4mini DMR settings
Here's an example on how to program your DMR radio. I use a TYT MD-380, but the config is similar to any DMR radio.
The important things to set up is, the Time Slot (TS) or repeater slot to 2, Color Code 1 and Group List TG-9.
General DV4mini Troubleshooting
Having difficulties getting started ? Here's a few common solutions.
1. Did you get your DMR ID? This is necessary for all mode with the DV4mini. You will find below the link with a step by step procedure to get started.
http://laboenligne.ca/?page_id=291
2. Did you install the 32 bit (x86) Microsoft Visual C++ package ? Even if you have a 64 bits system.
https://www.microsoft.com/en-US/download/details.aspx?id=48145
3. Make sure you have the latest software and firmware versions.
Download it from:
http://dv4m.ham-dmr.ch/
4. To update the firmware see the video below, it's on Raspberry Pi but it's the same as the Windows version. Check at 3:47 minute.
5. For C4FM you can ;
Try to transmit and check on the dashboard for your call sign. Choose the reflector you are on in the list below.
http://fcs001.xreflector.net/
http://fcs002.xreflector.net/
6. Did you try the FCS001 port 99? It's an echo test, this is also a good place to start troubleshooting.
7. You will also find around 10 video on our YouTube channel about the DV4mini.
https://www.youtube.com/channel/UC6Ib70 ... b4EOdIYaLQ
If you still have problems, feel free to ask questions.
DV4mini Raspberry Pi changing the language
When you connect to your Raspberry Pi, you will need to go in terminal and type raspi-config and select option 4 and then change the language to English us UTC-8. In the DV4mini software on the expert tab you can change it from German to English.
Raspberry Pi Autostart for the DV4mini software
For the autostart it's a manual configuration.
1)Create autostart directory /home/pi/.config/autostart
2) Copy this file into it : start_dv4mini.desktop
3) Copy the file dv4k.png into this directory /usr/share/pixmaps/
4) Make sure all files as the right (anyone) to execute
5) Reboot the DV4mini, the software will run in the background only and will connect to your last connection mode and reflector. To change it, open as normal the DV4mini software and change mode and reflector as you wish.
If you need to dowload the dv4k.png click here http://dv4m.ham-dmr.ch/V1.6/Linux/ARM/dv4k.png
Updating the DV4mini Compact software
Click on READ in the Config tab, you will loose all configs. The software will closed and update itself. If the software tells you that your up to date (text is green) with the actual version it will not update. If it's says that there is a new version available (text will be in red) it will update.